Home Page
Vegan Topics
Vegan Resources on the Web
Pictures of Vegan Dishes
Menu Ideas
Recipe Index
How to make tofu at home
spacer1
Health Topics
Spiritual Topics
Trip Reports of Hiking areas in and around Brevard, North Carolina NC
Recent Updates
Contact Info
spacer1

Vegan Meal Ideas

Breakfast                        Lunch/Supper

I think part of the problem that people run into when they decide to eat meat-free is that they try to design meatless meals based on the meat centered meal concept: Meat as the centerpiece of the meal, with 2 side dishes (usually a vegetable and a starch). And then maybe a bread product on the side.

So meatless meals turn into No Centerpiece, plus a serving of vegetables, and a serving of starch. Very boring. Plus, not enough calories. And not very flavorful. Meat provides meals with all of these: the “Oooo, what's for dinner” factor, plus flavor, plus “staying power” ... the satiety that keeps one satisfied for hours afterward.

A successful vegan meal must provide these same 3 things: The Centerpiece issue, Flavor, and Satiety ... the feeling of being full, being satisfied when you leave the table.

To design a vegan meal, first and foremost, get rid of the 3 parts idea (meat, potato, vegetable). Sometimes a vegan meal will have only one part. Other times more. One of the exciting parts is that vegan cooking provides such variety that meat based eating never can. That is one of the primary things that originally made me choose to remain a vegetarian after my initial 6-month “trial”: I discovered there were SO many more options out there for meal plans. Meal after meal was interesting and tasty and fun, and no repeats!

Additionally, many of our common meals can be easily veganized, which means you can still be eating “normal” foods. Mexican burritos and tacos, Italian spaghetti and lasagna, Middle Eastern dishes, Indian dishes, all these provide for great bases for vegan meal centerpieces.


Breakfast Items:
==============

Most Breakfast items are either already vegan, or can easily be veganized. Most breakfast cereals are vegan. There are many types of non-dairy milks, from rice, to soy, to hemp. And among milks of the same type --- say soymilks, different brands taste totally different. So if you try one and do not like it, try another type.

Silk Soy Milk is pretty universally well received, but is also one of the priciest.

I would recommend staying away from the low fat or “lite” milks ... non-dairy milks are already low fat to begin with, and have no cholesterol whatsoever. The low fat ones are very watery and not flavorful at all.

A very inexpensive source of milk is to make your own --- that way, you can tailor it to just your taste, adjusting the amount of salt, sweetener and other flavoring (like vanilla) that you wish to use. I've estimated that my homemade milk comes out to about 20 cents/quart!

All hot cereals are vegan: oatmeal, grits, cream of wheat, etc. If you like to add butter to these, you'll find Earth Balance just as tasty.

If muffins are your idea of breakfast, there are a number of sources of great vegan muffins: my favorite is a variation on a recipe from Bryanna Clark Grogan.


Pumpkin Chocolate Chip Muffins
=========================

Adapted from a recipe by Bryanna Clark Grogan, published in her Jan-Mar 2006 issue of The Vegan Feast.

DRY MIX:
2 cups whole wheat PASTRY flour (do not substitute regular whole wheat flour or the muffins will be tough)
1 1/2 cups unbleached white flour
4 teaspoons baking powder
1 teaspoon salt
1/2 teaspoon baking soda

WET MIX:
1 cup soymilk
8 ounces (2/3 of a box) firm SILKEN tofu
2 tablespoons lemon juice
1 1/2 cups brown sugar
1/2 cup pumpkin puree (canned pumpkin)
1/4 cup oil
1 tablespoon oat bran
1 teaspoon vanilla

ADDITIONAL:
1 1/2 cups vegan chocolate chips (note that there are a lot of really awful tasting vegan chocolate chips out there. By far the best tasting one I've found is Ghirardelli. A nice side benefit is that it is also easily found in most grocery stores.)

Preheat the oven to 350°F. Prepare 12 jumbo muffin cups by lining them with muffin papers.

Whisk together the Dry Mix ingredients in a large bowl.

In a blender, combine the Wet Mix ingredients until smooth.

Pour the Wet Mix into the Dry Mix and stir briefly-- it will still be lumpy. Add the chocolate chips.

Scoop evenly into the muffin cups.  The batter will be to the tops of the pans.

Bake 20 minutes, till the surface springs back when lightly touched.

Allow to cool for 10 minutes in the muffin pans, then remove to cooling rack to cool completely.

NOTE:  For 5 years, Bryanna Clark Grogan published a wonderful quarterly newsletter chock full of pages and pages of vegan recipes (60-70 pages per issue).  She is no longer publishing this, but she is developing each of the issues from those 5 years into a PDF file for sale for $5.00 each.  

The above recipe was adapted from a recipe in her January-March, 2006 issue (not yet for available for sale).  But keep your eye out for this issue .... it was one of my favorites, with lots of breakfast items such as Blueberry-Lemon-Cornmeal Muffins, Pina Colada Muffins, Basic Big Bakery Style Muffins, Wheat Berry Pancakes, and Oat-bean Breakfast Patties.


If eggs and toast are your idea of breakfast, a very tasty vegan version is ........

Scrambled Tofu / Breakfast Burritos
========================

Mix together and keep in an air tight jar:

1 tsp. turmeric
1 tsp. curry powder
1 tsp. cumin
4 tsp. onion powder
1/4 cup nutritional yeast

This mixture can be used to make scrambled tofu, breakfast burritos, chimichangas.

All of the above 3 items are made basically the same way ---- by scrambling together some of the above spice and tofu.

It is important to use the firmest tofu you can find.

Heat some olive oil or Earth Balance in a skillet. Add in some chopped onion and simmer till soft. Then crumble in a pound of tofu and 1/2 tsp. salt and stir. Depending upon how dry or not your tofu is, this is the time to cook all of the moisture out (you don't want soggy scrambled tofu!!)

Once the tofu is the level of dryness you want, sprinkle in some of the spice powder, above, stirring until the spices are all worked through and cooked.

How much to use?

Well it's very much according to personal preference .... if you're just making scrambled tofu to serve like you do scrambled eggs (with toast, potatoes, what not .... ), start with 2-3 teaspoons per pound of tofu and increase as desired. Serves 2-4.

For breakfast burritos, mix in about 2 TABLESPOONS of the spice mixture, as well as a little bit of salsa.

Then spread this mixture down the middle of 4-6 warmed burritos and serve.


Orange Pecan Cornmeal Waffles
=========================

Another winner from Bryanna Clark Grogan.  See the original post for this recipe HERE in Bryanna's blog: Notes from The Vegan Feast.

Soak 1/3 c. dry soybeans OR chickpeas OR white beans overnight in plenty of water

1 1/2 c. fresh water
1/3 c. orange juice concentrate
1 c. cornmeal
2 T. oat bran (or you could use rice bran or wheat bran instead)
4 tsp. sugar or other sweetener
2 T. ground golden flaxseed (measure after grinding)
1 T. grated (organic) orange zest
1/2 T. baking powder
1 tsp. pure vanilla extract
1/2 tsp. baking soda
3/4 tsp. salt
1/3 c. finely chopped toasted pecans

The night before:
Soak the beans in plenty of water to cover, with a few inches of water above the beans.  The beans can soak in water in the refrigerator for up to a week with no fermentation, if you aren’t sure when you’ll make the waffles.

In the morning:
Drain the beans. Place them in the blender along with all of the other ingredients. Blend until smooth and light and foamy. This may take several minutes.

Let the batter stand while you heat up your NONSTICK waffle iron.  You will have best results using a regular waffle maker, not a Belgian waffle maker.  The Belgian waffle is too thick and does not cook properly with this batter.

NOTE: Even if you have a non-stick iron, this recipe will work better if you spray the grids well with oil from a pump-sprayer or Pam cooking spray.

When the iron is hot, pour on about a heaping 1/3 c. of batter for each 4” square waffle . Close the iron and set the timer for 7 minutes. Don’t check before 7 minutes is up. If the iron is hard to open, let it cook a couple of more minutes.

If the batter gets thicker on standing, add a LITTLE water, just until it’s the consistency you started out with.

The waffle should be brown and crispy. Serve immediately, or let cool on cake racks. When they are cool, they can be frozen in plastic bags or rigid containers. Serve with your favorite toppings.

If you don’t use up all of the batter, and you don’t want to cook the waffles ahead of time and freeze them, just refrigerate the batter in the blender with the lid on. You can re-blend the batter (adding a tiny bit more water if the batter has become too thick) just before cooking the waffles.


Vegan Omelette for One
===================

This recipe is just plain fabulous!! I still can't get over how much like the egg version this omelette really is!!  I make this for myself at least once a week.

Recipe is from Susan Voisin, originally posted on her blog: The Fatfree Vegan.   Click here to see the original blog post.

You need to use a truly non-stick skillet to make the omelette come out of the pan intact.  Be sure to oil it and have it hot before you pour the batter into the pan.   (NOTE:   There are some wonderful new non-stick pans out there that do not need ANY oil or pan spray.  Two brands are Berndes and Swiss Diamond.  I recently bought a Swiss Diamond 12" skillet, and am utterly amazed at how well it works with zero oil or greasing needed.  This page has a video of this omelette being cooked in my Swiss Diamond pan.

Also: You may double this recipe but be sure to cook each omelette individually, one at a time.

6 ounces (1/2 package) Mori-Nu silken tofu (or regular extra-firm silken tofu)
1 tablespoon soymilk
1 tablespoon nutritional yeast
1 tablespoon potato starch or cornstarch
1 teaspoon tahini
1/8 teaspoon onion powder
1/8 teaspoon turmeric
1/4-1/2 teaspoon salt, or to taste
1  pinch chipotle pepper or smoked paprika (optional)

Also needed:

Omelette filling of choice (have filling warm or at room temperature)    (I rather like these plain, however mushrooms and spinach always makes a good filling.)

Blend together all ingredients until smooth. I use a stick blender which works well.   

Spray a large non-stick skillet with olive oil and heat on medium-high until very hot.  Pour the batter into the center of the skillet in a circular pattern about 6-8 inches across, and use a spoon or spatula to smooth over the top.  Place your filling ingredients over the batter, and reduce the heat to low.

Cover and cook for about 2-4 minutes, checking often to see if it's done.  When the edges have dried out, lift a small section with a spatula and check to see that the omelette is set.  It will be golden in color, but not browned.  When it's ready, loosen the omelette by sliding the spatula under it from each direction, and then fold one side over the other.

Cook for about one more minute.  Carefully lift or slide it onto a plate and serve hot.


Buckwheat Pancakes (Gluten Free)
==========================

This recipe is from Isa Chandra Moskowitz, of Veganomicon fame.  Make 'em up and enjoy them whether or not you can eat gluten.  These are yet another example of you'll never know they're gluten free.

Vegan Buckwheat Pancakes from Isa Chandra Moskowitz

I happened to have had all the specialty ingredients listed below on hand, and so made these as written (although I substituted 1 cup of soy milk for the 1/2 cup water and 1/2 cup soy milk that the recipe called for). 

NOTE:   For the quinoa flour, I just ground up regular ol' dry, uncooked quinoa.  I was worried about it imparting a bitter taste, since they always tell you to rinse quinoa before you cook it, but I tasted the flour and it tasted fine.  The pancakes also tasted just perfect!

However, last week I made these babies for the umpteenth time, and did notice a strong, overpowering bitter taste to them.  The quinoa I used this time around was a bulk bin quinoa; previously I'd used a commercial, boxed variety.   So, the next time, I substituted Sorghum Flour for the quinoa flour, and the pancakes were great.  Moral of story ... probably any gluten free flour would work, although I suspect brown rice flour might give the pancakes a grainier texture than one might like.

Isa mentions other substitutions you can use if you don't have all the ingredients, including just using whole wheat pastry flour if you are not needing to make a gluten free pancake.

Makes 8 five-inch pancakes
      (as you can see in the picture above,
        mine are a LITTLE bit bigger!!)

1/2 cup buckwheat flour
1/4 cup quinoa flour (see note in above paragraph)
1/4 cup corn flour (NOT cornmeal, corn flour is lighter)
              (try using 1/2 cup brown rice flour as a subtitute for the above two                               items if needed)
1 tablespoon ground flax seeds (or flax meal)
2 tablespoons tapioca flour (cornstarch or arrowroot would be okay, too)
1 tablespoon baking powder
               (not a misprint .... 1 Tbsp. is correct)
1/4 teaspoon cinnamon
1/4 teaspoon salt
1/2 cup non-dairy milk
1/2 cup water
                (I skipped the water and just used 1 cup soy milk)
2 tablespoons pure maple syrup
2 tablespoons canola oil
1/2 teaspoon pure vanilla extract

In a large mixing bowl, mix together all flours, flax seeds, tapioca, baking powder, cinnamon and salt. Create a well in the center and add the remaining ingredients. Use a fork to mix well for about a minute. Let the batter rest, and preheat a large, non-stick or cast iron pan over medium-high heat.

Gluten Free Vegan Buckwheat Pancake Cooking in Skillet
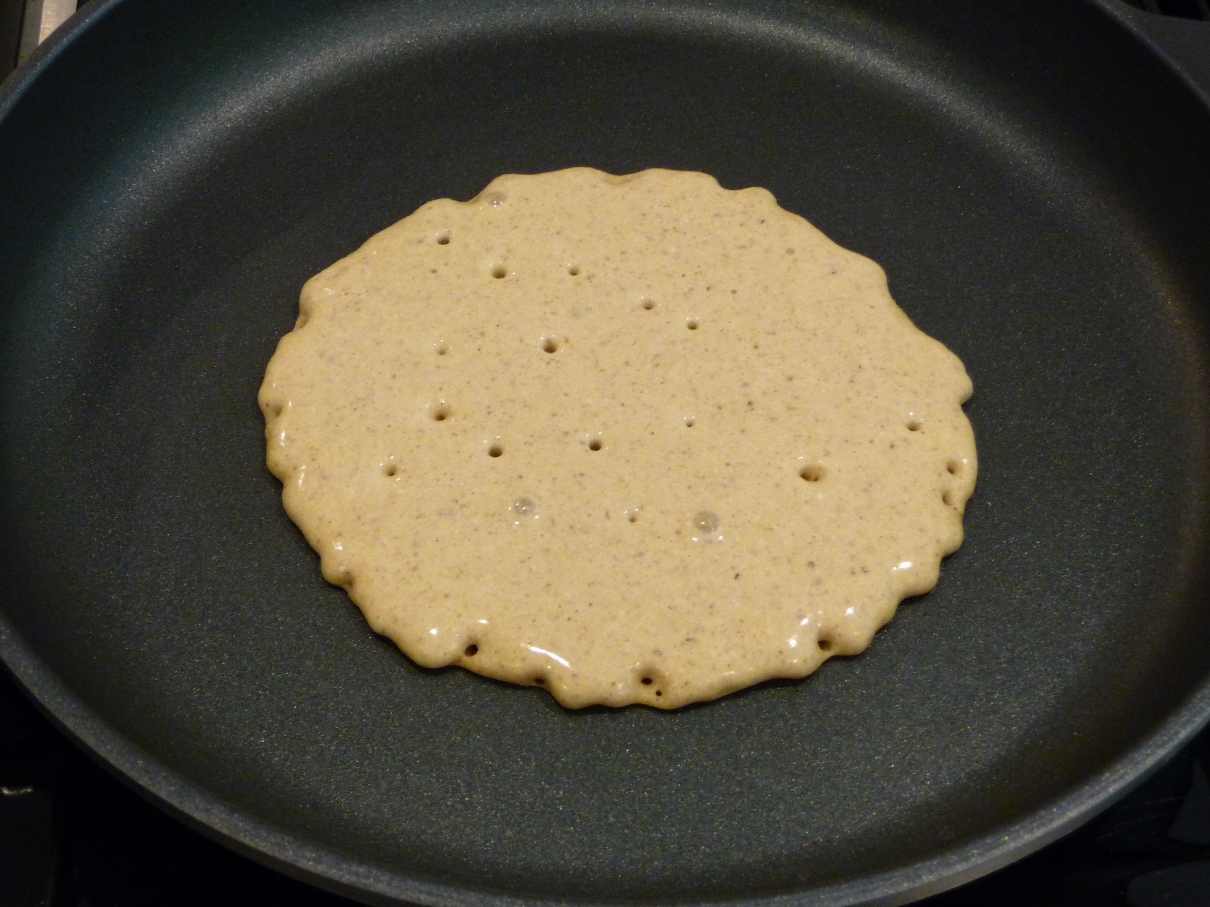
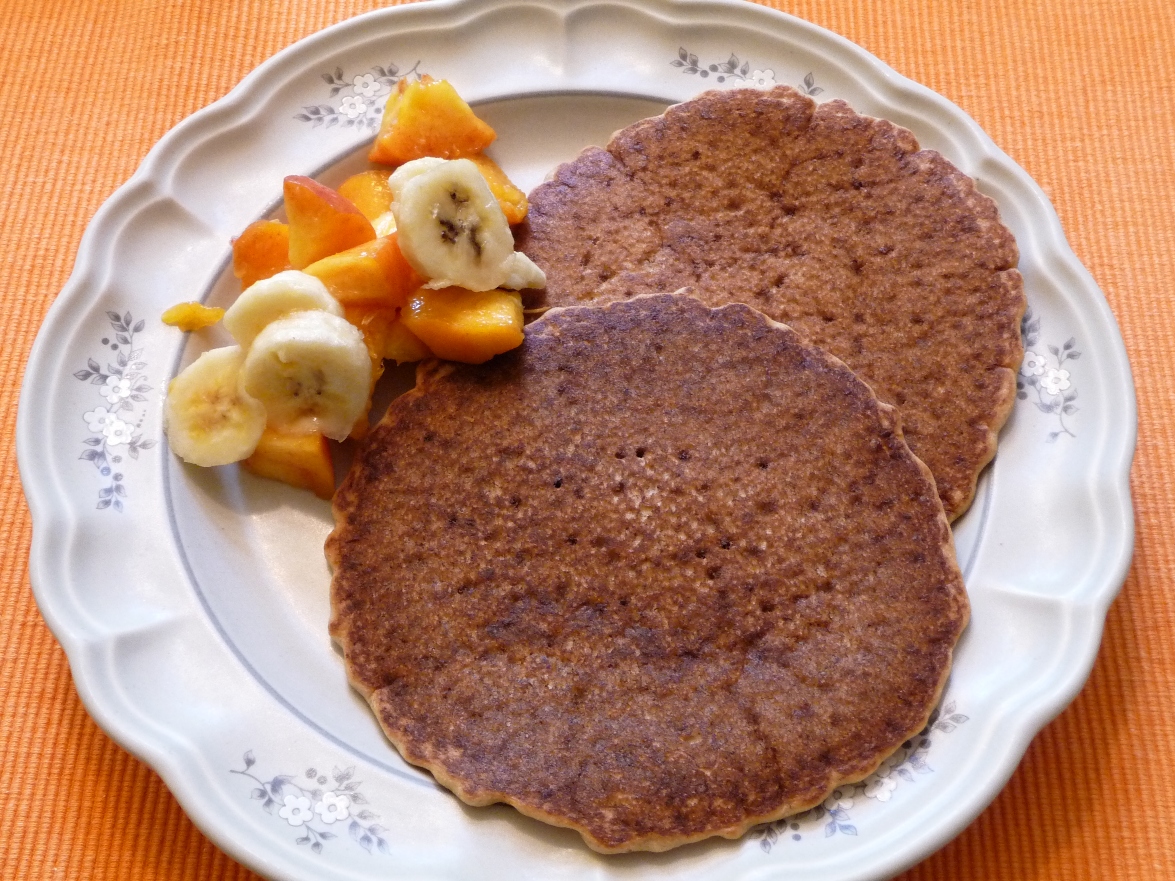
When pan is hot, spray with a thin layer of cooking spray and use a 1/4 cup measure to pour batter onto the frypan and form pancakes.  The pancakes should start to form little air bubbles, but not as much as "normal" pancakes do, so don't worry. Cook for two and half to three minutes, then flip and cook for 2 minutes more. Keep warm on a plate covered with tin foil until ready to serve.


Lunch/Supper Items:
=================

Black Bean Dip / Black Bean Pizza
===========================

One fifteen ounce can black beans, rinsed and drained
1 tsp. cumin
1 tsp. hot sauce
1-2 garlic cloves, crushed
2-4 Tbsp. olive oil

Dump the beans into food processor with metal blade. Add the cumin, hot sauce, garlic cloves and 2 Tbsp. olive oil and process. Add as much additional oil as needed to create a smooth dip.

FOR FAT FREE version: replace olive oil with salsa.

To take the edge off the raw garlic, heat the whole, peeled clove in the olive oil in the microwave. Pour out 4 Tbsp. olive oil into a small cup. Add 2 whole garlic cloves (peeled). Heat gently in 15-30 second increments until the oil is hot. The cloves will have become slightly shriveled, and the oil will have turned cloudy.

Crush the cloves and add to food processor, and use the garlic infused oil for the 2-4 Tbsp. of oil the recipe lists.

If you are going to bake this recipe in the following pizza recipe, there is no need to cook the garlic cloves in the oil, as the bake in the oven will do the same thing.

For Dip: Serve room at temperature.

For Black Bean Pizza

Take a ready to use pizza crust (or make your own). Spread the above black bean dip over the crust. Top the dip with your favorite toppings (items like red and green bell peppers, and chopped onions look very good against the black bean dip). Do not top with cheese – you will be topping with salsa once it is baked.

Bake at 400° for 10 minutes or so, until the black bean mixture looks slightly dried out and the crust is crispy. Remove from oven and top with room temperature salsa. Slice and serve.

Also, see this link for using this as a topping for polenta slices.


Quick and Easy Potato Soup
=======================

Another winner of a recipe from Susan Voisin. Originally posted on her Fatfree Vegan blog.

3 medium Yukon Gold potatoes, cooked and peeled, if desired

Potatoes can be microwaved, boiled, steamed, or even baked beforehand, but microwaving is quickest.

1/2 small onion
1 cup vegetable broth
1/4 teaspoon rosemary
1/8 - 1/4 teaspoon white pepper (using more will make it spicy)
1/2 teaspoon salt, or to taste
1 tablespoon raw cashews or 1/2 tbsp. cashew butter (optional)
1 tablespoon nutritional yeast
1 1/2 cups soymilk or other non-dairy milk

Chop the onion and sauté it until soft in a medium-sized saucepan. Cut the potatoes into cubes and add 2/3 of them to the pan, along with broth, rosemary, white pepper, and salt. Simmer for about 15 minutes. Pour into blender along with cashew butter, soymilk, and nutritional yeast. Blend until smooth. Return to pan, add remaining potatoes, and cook, stirring often, over low heat until hot.


Sweet Potato Patties
================

Another winner of a recipe from Susan Voisin.  Originally posted on her Fatfree Vegan blog.

Cooking the sweet potatoes in the microwave is a real time saver, but feel free to bake or steam them instead. The moistness of sweet potatoes varies, so you may need to add a little more flour to achieve the right texture.

1/2 tablespoon ground flax seeds + 2 tbsp hot water
2 medium sweet potatoes (about 18 ounces, total)
2-3 teaspoons ground cumin
2 teaspoons ground coriander
2 cloves garlic, minced or pressed
1/8 - 1/2 teaspoon cayenne pepper (to taste)
1 teaspoon salt
1/4 cup minced parsley
juice of 1 lemon
1 cup chickpea flour or besan
1/2 teaspoon baking powder
sesame seeds (optional)

Mix the flax seeds with two tablespoons hot water and set aside to thicken.

Pierce sweet potatoes several times with a fork and place on paper towels in microwave. Microwave on high for 2 minutes, turn over, and then cook for another 2 minutes. Check for tenderness, and if not cooked all the way through, cook in increments of 30 seconds until tender. Set aside to cool until easy to handle; peel and place in a large bowl.

Preheat oven to 400F. Mash sweet potatoes well with a masher or a fork. Add the flax mixture, seasonings (including parsley), and lemon juice and stir well. Mix the chickpea flour with the baking powder and add it a little at a time to the sweet potato mixture. Stir until well-combined. Batter should be stiff; if not, add chickpea flour a tablespoon at a time until batter is thick. (If the batter is too stiff to blend in all the flour, add water a tablespoon at a time.)

Oil a baking sheet or line it with parchment paper or silicone baking mat. Use a cookie scoop or rounded tablespoon to make about 20-22 little mounds of dough on the baking sheet (dipping the scoop in water every now and then will help prevent the dough from sticking to it). Flatten the balls to about 1/2-inch thick and 1 1/2-inches wide. Sprinkle with sesame seeds, if desired.

Bake for 20-25 minutes, until bottoms are medium brown. Serve hot with yogurt-tahini sauce (next recipe). These keep well and can be reheated briefly in the microwave.

Yogurt-Tahini Sauce

1/2 cup soy yogurt
2 tablespoons tahini
2 teaspoons lemon juice
1 clove garlic, pressed
1/4 teaspoon salt
1 pinch red pepper
4 teaspoons ketchup   (weird addition, but DON'T leave it out!
                                                  It's the PERFECT flavor addition!)
2 tablespoons water

Mix all ingredients well in a small bowl. Add additional seasonings to taste.


Chimichangas
===========

For these, use the same recipe as for Breakfast Burritos.  Once burritos are filled and rolled, add some oil to the skillet you sauteed the tofu and spices in (don't clean ... the spices in the oil add some GREAT flavor).

Once the oil is hot, fry the burritos on both sides till crisp.


Soy Curls
========

As a rule, I do not use specialty vegan processed foods (like the “fake” meats, etc). They are mostly “OK” tasting at best, and “chemically” tasting at worst. Additionally, they have lots of chemical ingredients as part of their ingredient list. Vegan diets taste best when whole foods are used.

One exception to this rule is a product I've found called “Soy Curls”. These are a whole food (made from the whole soybean), and no additional chemicals added. They are certified NON-GMO. They make a wonderful main dish ingredient, and are suspiciously SO very much like chicken, that they might put some vegans off!

They can be mail ordered from several sources (google “Soy Curls”), and many Seventh Day Adventist stores have them. They are a dehydrated product that you soak in hot broth to prepare, and then use like chicken. Serve with gravy over rice for the ultimate comfort food!!

Sandwich Fillings
==============

Most sandwiches are meat based, but that doesn't mean that is the ONLY choice!!

Two of my favorite are Eggless Egg Salad and Tuna less Tuna Salad:

Eggless Egg Salad


Tuna-less Tuna Salad
================

For this you'll need to plan ahead and freeze one pound of extra firm tofu. (Not the silken kind). Just put the entire thing in the freezer as you get it from the store .... don't open or drain it. Freezing totally changes the texture of tofu, making it similar to tuna.

Freeze for at least a week.

Then thaw. Do this by leaving it in the refrigerator for 24 hours, or on the counter overnight.

Once thawed, open the package, drain the liquid, and put the block of tofu in a colander. Squeeze as much moisture out as you can. Once most of the moisture is gone, put the block in several layers of clean kitchen or paper towels and squeeze some more.

Then crumble the now very dry tofu into a bowl. Add in whatever chopped veggies you like in tuna (less) salad --- celery, green onion, etc.

In a separate bowl, mix together:

1/2 cup vegan mayonnaise
2 tablespoons soy sauce
1 tablespoon lemon juice
2 tsp. kelp powder

Whisk together till very smooth. Pour over the tofu and blend well and serve. You'll be amazed how much this reminds you of tuna!!


Chick Pea Spreads


An EXCELLENT source of recipes is the monthly newsletters from Dr. John McDougall, free on line.  All of his recipes are fat free, and I'm amazed how fabulously tasty they are. They all also focus on using grocery store items, and short preparation times. This next recipe is one of my favorites from his newsletter.

Layered Bean and Potato Casserole
==========================

Layered Bean and Potato Casserole
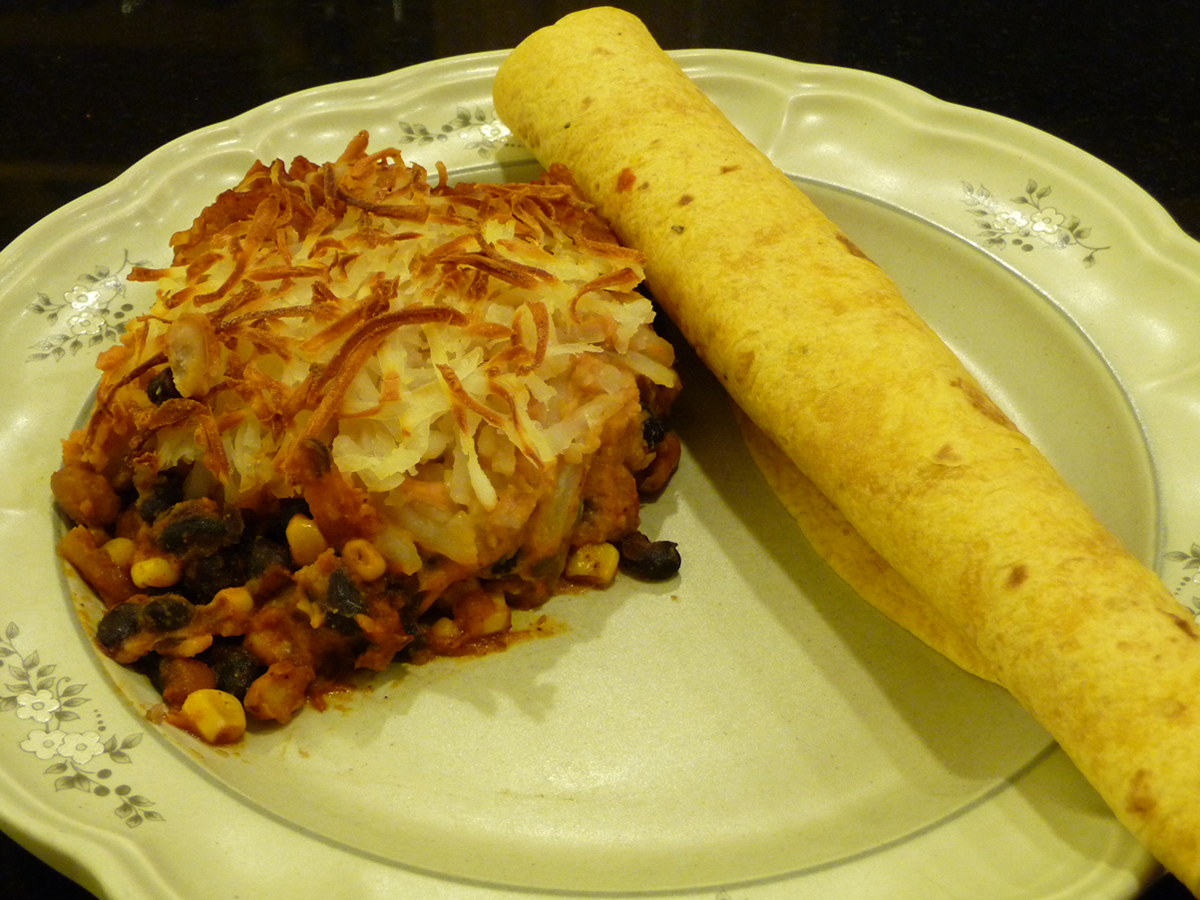
Shown served with a warm tortilla
Click on image for full size pic

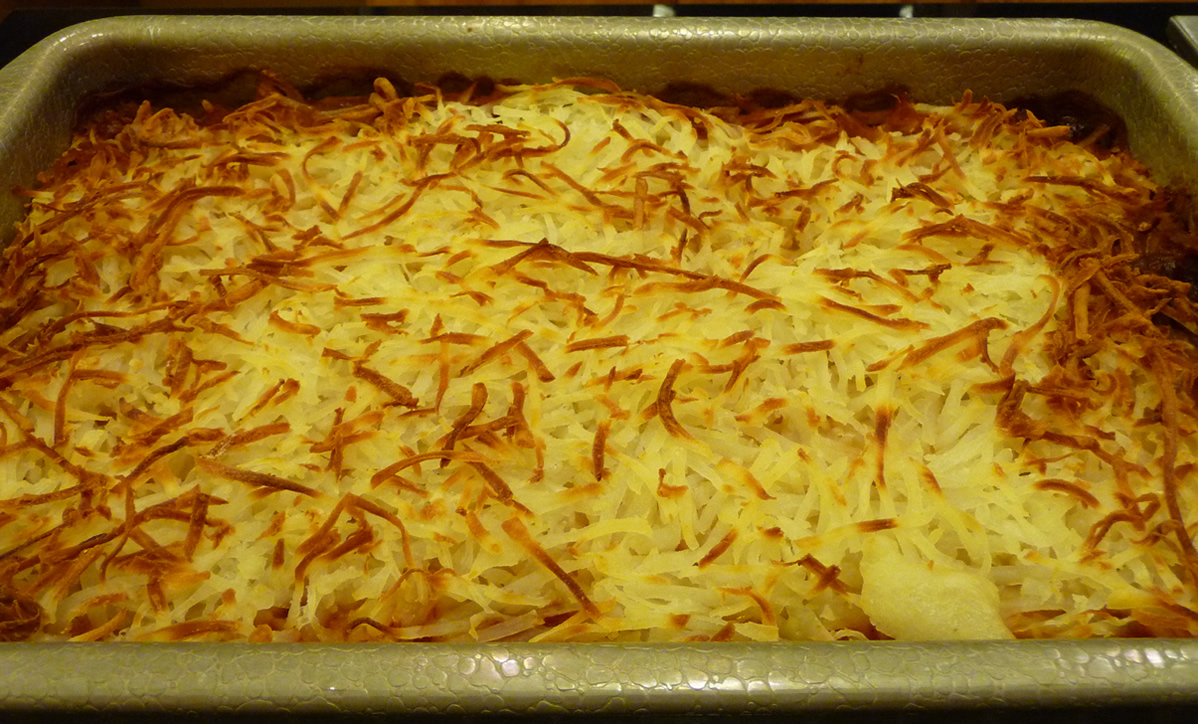
This tasty casserole (which is extremely quick to throw together) consists of a bottom layer of three kinds of beans, mixed with onions, corn, and tomato sauce.  This is topped with a middle layer of white beans pureed with salsa and other flavorings into a saucy topping that is spread over the base layer.  It is topped with a bag of grated potatoes, and then baked.

Once baked, the potatoes make for a thick, crunchy topping over a spicy, saucy, bean layer.

From the John McDougall Newsletter, June 2008

Preheat oven to 375 degrees.

Bottom layer:

1 15 ounce can black beans, drained and rinsed
1 15 ounce can red or pinto beans, drained and rinsed
1 15 ounce can chili beans, undrained
1 8 ounce can tomato sauce
1 cup frozen corn kernels, thawed slightly (or canned corn)
¼ cup chopped onion
2 teaspoons chili powder

Mix all above ingredients together and ladle into the bottom of a 9 x 13 inch baking dish, distributing evenly.

Middle layer:

1 15 ounce can white beans, drained and rinsed
½ cup fresh salsa
1/3 cup nutritional yeast
2 tablespoons lemon juice
1 teaspoon granulated onion
1 teaspoon prepared yellow mustard

Place all these ingredients in a food processor and process until very smooth. Pour over the bean layer and spread evenly.

Top layer:

1 20 ounce bag fresh shredded oil-free hash brown potatoes

Sprinkle the potatoes evenly over the bottom two layers. Bake uncovered for 45 minutes until potatoes are brown and sauce is bubbly.

Layered Potato Bean Casserole


back to top